1
This is a comprehensive guide on how to download & install Qualcomm drivers and setup ADB drivers on your PC. Read the complete guide on how to troubleshoot driver issues and enable the Diag port the right way without wasting your time.

How to Enable Diag Mode on Qualcomm Devices: Samsung, Huawei, Google Pixel, Oppo, Vivo, Lenovo, and Asus
It is a complete step-by-step guide on how to enable diag mode on all popular Qualcomm devices like Samsung, Huawei, Google Pixel, Oppo, Vivo, Lenovo, and Asus.
Qualcomm Diag Mode is a special way that phones and other devices made by Qualcomm can communicate with a computer. If a phone has network connectivity issues, mostly it is because of corrupt IMEI, the method to get it work is to repair IMEI of your device. Repairing IMEI requires Diag port in your device Manager, I have written a comprehensive guide and made a YouTube video tutorial on how to enable or enter diag mode on your Android device.
How to enable Diag Port
This is a comprehensive guide on how to download & install Qualcomm drivers and setup ADB drivers on your PC. Read the complete guide on how to troubleshoot driver issues and enable the Diag port the right way without wasting your time.
Step 1: Download Qualcomm Drivers
The most part of this guide is to install the right Qualcomm USB drivers on your Windows PC. Below is the link to download and install them on your PC.
Step 2: Download & Install ADB Fastboot Drivers
It is really essential to first setup and install fastboot drivers on your PC. There are many fastboot drivers program, personally I like the Google platform tools, just download and open the command window in the same folder and you can execute the adb commands to enable diag mode of your device.
Another popular option is adb fastboot drivers which can you help you install fastboot drivers system wide so you can just launch the command line and execute adb commands from anywhere on your system.
Just use any of the above to install drivers on your PC. Once installed, move to 3rd step and find the adb commands for Diag port.
Step 3: ADB Commands to Enable Diag Port
Enabling DIAG mode on an Android device may seem like a daunting task, but with the right tools and knowledge, it can be accomplished easily. There are a few requirements that need to be met before you can enable DIAG mode on your device.
Note: If you’re using adb commands this you must have proper root access on your device, otherwise it will not work.
Here is the list of requirements before you try to enable diagnastic mode on your Qualcomm device:
- First and foremost, USB Debugging must be enabled on your device. This can be done by navigating to Settings > Developer Options > USB Debugging and turning it on. Once USB Debugging is enabled, you can move on to the next step.
- The device must be connected to a computer with the appropriate OEM USB driver installed. This ensures that the computer can communicate with the device properly.
- It’s also important to note that rooting the device is necessary before enabling DIAG mode.
Keep in mind that enabling DIAG mode on a device can potentially damage the device, so it’s important to proceed with caution and only attempt this process if you have a good understanding of the steps involved. By following these requirements and taking the necessary precautions, you can enable DIAG mode on your Android device and take advantage of its diagnostic capabilities.
Adb commands
Connect your phone to PC and make sure it is ON. You can copy the exact commands from here and paste in the command line.
Run command prompt from Platform tools folder or simply run it Windows start menu if you’ve used 15 seconds adb installer.
Type the following command to check whether your device is connected to ADB:
adb devices
Once you see the device is recognized, type the following command to enable diag port:
adb shell
su
setprop sys.usb.config diag,adb
Also open the Device Manager, when your phone is in the diag mode, you’ll see a port showing in the device manager as shown in the screenshot:

901D for flashing
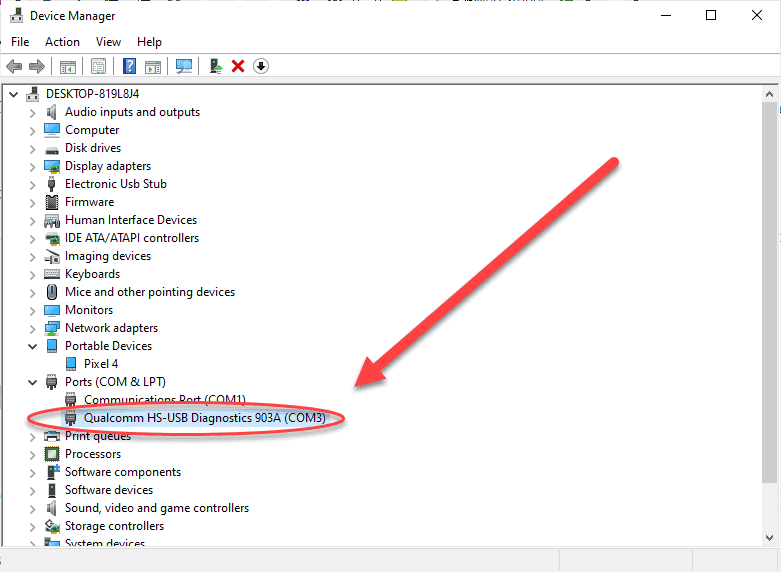
903A for engineering mode
Commands for Google Pixel:
You can also try the following commands, you can copy all the below code and execute at one time or copy single line at a time, it works both way.
adb shell

su

resetprop ro.bootmode usbradio

resetprop ro.build.type userdebug

setprop sys.usb.config diag,diag_mdm,adb

diag_mdlog
Codes for some Of Non ROOTED Generic Qualcomm ”CPU”
Enabling DIAG port (Engineer mode) on non-rooted Qualcomm phones requires specific dial codes to be entered into the phone’s dialer app. Here are the dial codes for some popular phone brands:
Oppo: *#801# or *#8011#
Xiaomi: ##717717## or ##13491##
Lenovo: ##717717## or ##13491## or *#*#8899#*#*
Huawei: ##2846579## or ##6130##
Vivo: #558# or ##717717##*
Infinix: ####8789#
Asus: ##3646633## or ##9860##
Note that these codes may not work on all phone models or firmware versions. Additionally, enabling DIAG port on non-rooted phones may be restricted by the manufacturer and may require specific permissions or tools. It’s important to exercise caution and follow proper procedures when making any changes to your phone’s settings.
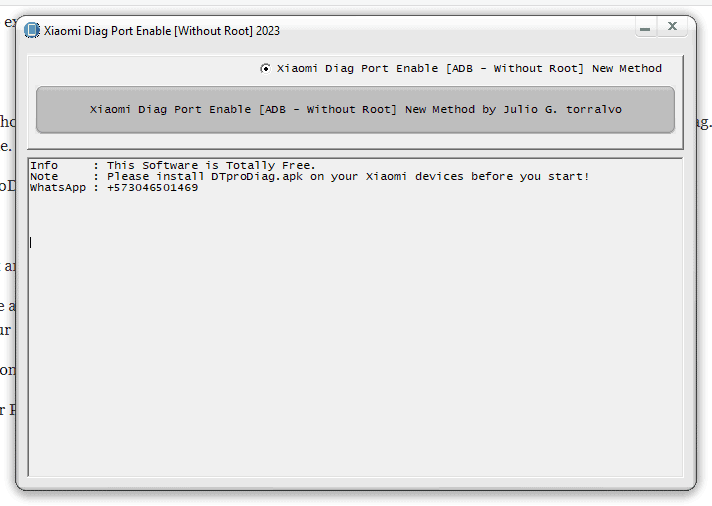
Xiaomi Diag Port
You can use a program to enable diag port without having to root and unlock bootloader on your Xiaomi device. You need to install the DTproDiag.apk file on your device and then run the program on your PC to enable diagnastic mode.
Step 1: First download the program and DTproDiag.apk file.
Step 2: After downloading the zip file, unzip it and you’ll find the following files:
- DTproDiag.apk (Copy this to your phone and install it)
- Diag on.exe (Run this application on your PC)
Step 3: Go to Settings > About phone and tap on MIUI version for about 7 times to enable Developer options.
Step 4: Finally run the Diag on.exe file on your PC and connect your phone to PC.
Step 5: Click on Xiaomi Diag port enable (ADB – without root) button as shown in the screenshot below:
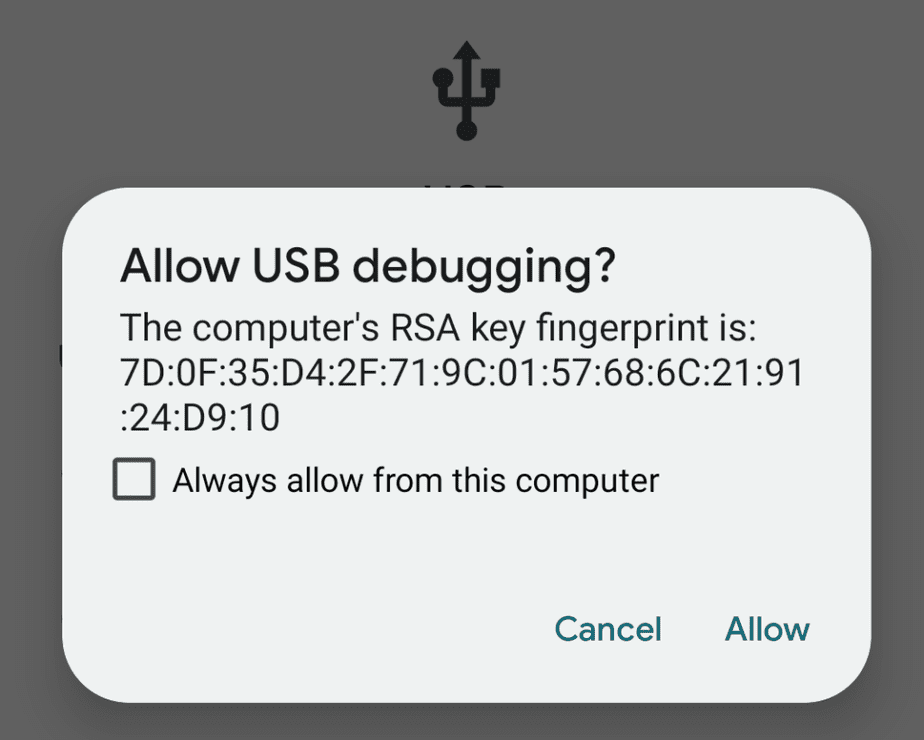
Step 6: Also, check your device, it will ask you to allow usb debugging? Yes check on always allow from this computer.
Conclusion
In conclusion, enabling diag mode on Qualcomm Android phones can be a useful tool for troubleshooting and diagnosing various issues with your device. By following the steps outlined in this post, you can easily activate this mode and gain access to advanced diagnostic features.
Also, as Android manufacturers focus on security, the methods might change in future, as currently some devices requires test point, some are possible with a paid software box.
However, it’s important to use caution when making any changes to your device’s settings, as incorrect configurations could potentially cause damage. Always research and follow the proper procedures before attempting any modifications, and use diag mode only as directed by a qualified professional. With the right knowledge and precautions, you can take full advantage of this powerful feature and keep your Qualcomm Android phone running smoothly.
Let me know in the comment section about your feedback, also make sure to check our Pixel 7 rooting guide, Google Pixel Android 13 Google Account Bypass, and how to factory reset Pixel 7 Pro and subscribe to our YouTube channel for guides and tutorials.
