How to Fix “DM-Verity Need to Check Verification Failed DRK” Error on Samsung devices
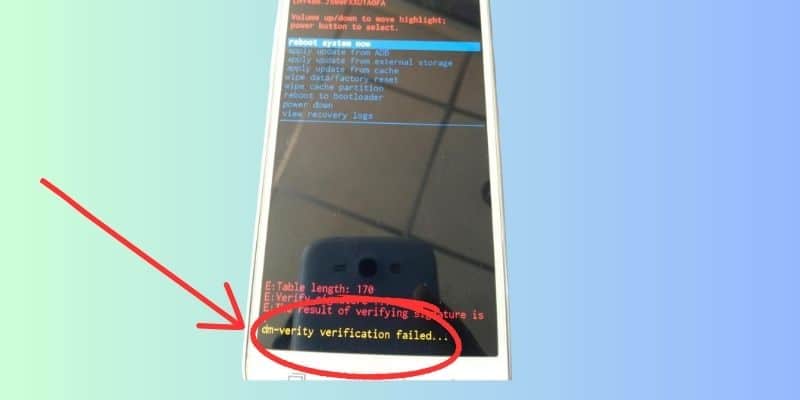
It is a 100% tested guide to fix one of the most commonly occuring errors on Samsung devices ‘DM-Verity Need to Check Verification Failed DRK‘ error. This error often occurs during the boot process and prevents your device from starting up properly and your phone will be stucked on the Samsung logo, kind of bootloop error. Also, when you try to boot into recovery mode, you’ll get the dm verification failed message at the bottom of the screen.
In this blog post, we will explain what DM-Verity is, its purpose, and provide step-by-step instructions to fix this error on your Samsung device.
Understanding DM-Verity
DM-Verity, short for Device Mapper Verity, is a security feature introduced in Android 4.4 KitKat to ensure the integrity of the device’s system partition. It utilizes cryptographic techniques to verify the integrity of the partition, protecting it against potential tampering and malicious modifications. When enabled, DM-Verity performs a verification check during the boot process to ensure that the system partition has not been altered.
What Causes the ‘DM-Verity Need to Check Verification Failed DRK’ Error?
The ‘DM-Verity Need to Check Verification Failed DRK’ error occurs when the verification check fails during the boot process. There are several possible causes for this error, including:
- Rooting or Custom ROMs: If you have rooted your device or installed a custom ROM, it can interfere with the DM-Verity verification process and trigger this error.
- Corrupted System Partition: If the system partition on your device has become corrupted or modified, DM-Verity may fail the verification check, resulting in this error.
4 Ways to Fix DM-Verity Verification Failed…
Now, let’s move on to the methods to fix this error, I have given 4 solutions to fix the error starting from easy to hard. So I would recommend you to start from wiping cache partition, then try a factory reset and then download the latest firmware for your phone and flash it using Odin.
Method 1: Wipe Cache Partition

- Power off your Samsung device.
- Press and hold the Volume Up button, the Home button (if applicable), and the Power button simultaneously until the device vibrates.
- Release the Power button but continue holding the Volume Up and Home buttons until the Android Recovery menu appears.
- Use the Volume Down button to navigate to the “Wipe cache partition” option.
- Press the Power button to select the option.
- After the process is complete, use the Volume Down button to select “Reboot system now” and press the Power button to restart your device.
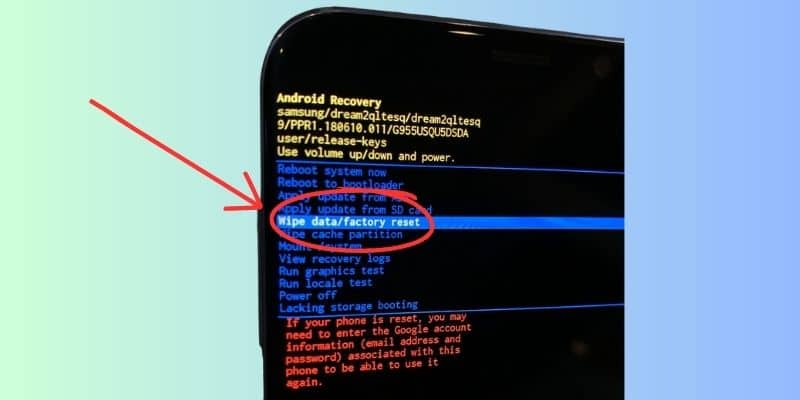
Method 2: Wipe Data/ Factory Reset
Performing a factory reset will erase all data on your device. Make sure to back up any important data before proceeding.
- Power off your Samsung device.
- Press and hold the Volume Up button, the Home button (if applicable), and the Power button simultaneously until the device vibrates.
- Release the Power button but continue holding the Volume Up and Home buttons until the Android Recovery menu appears.
- Use the Volume Down button to navigate to the “Wipe data/factory reset” option.
- Press the Power button to select the option.
- Follow the on-screen instructions to confirm the factory reset.
- After the reset is complete, select “Reboot system now” to restart your device.
Method 3: Flash Stock Firmware using Odin
Flashing stock firmware will revert your device back to its original state. Ensure that you have the correct firmware for your device model and follow the instructions carefully.
- Download the appropriate stock firmware for your Samsung device from samfw.com, sammobile.com, or updato.com.
- Put your device into Download Mode by powering it off and then pressing and holding the Volume Down, Home, and Power buttons simultaneously.
- Connect your device to a computer using a USB cable.
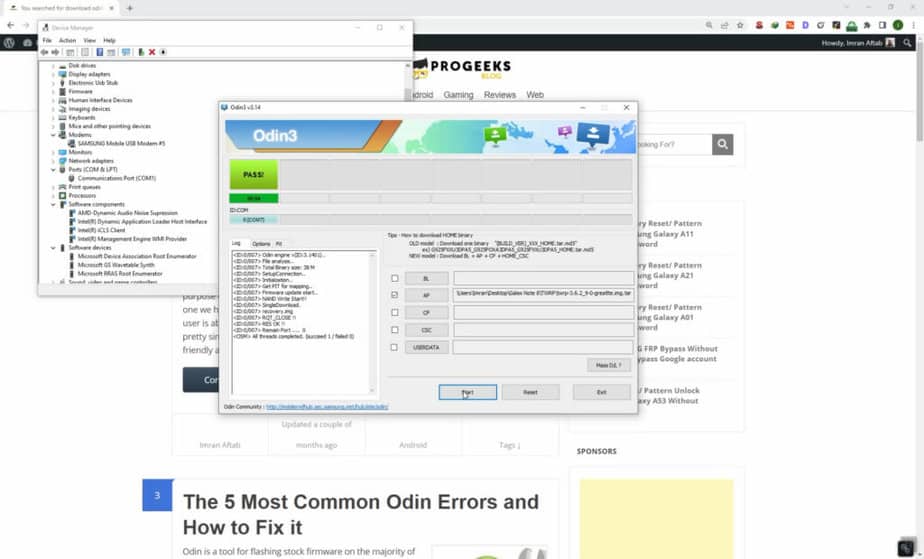
- Launch Odin (a firmware flashing tool) on your computer and ensure that your device is detected.
- In Odin, click on the AP or PDA button and select the firmware file you downloaded.
- Ensure that the “Auto Reboot” and “F. Reset Time” options are checked in Odin.
- Click the Start button to begin the firmware flashing process.
- Once the process is complete, your device will reboot with the stock firmware installed.
Method 4: Root your phone using CF Auto Root
Another method to fix the ‘DM-Verity Need to Check Verification Failed DRK’ error on Samsung devices is by flashing the CF Auto Root file. CF Auto Root is a popular rooting tool that can help resolve certain software-related issues, including the DM-Verity error.
Here’s a step-by-step guide instructions to use CF Auto Root to fix the error:
Before you proceed, it’s important to note that rooting your device and flashing custom files can void your warranty and potentially cause data loss. Proceed at your own risk and ensure you have a backup of your important data.
Step 1: Preparation
- Download the appropriate CF Auto Root file for your specific Samsung device model from the official website. Ensure that you download the correct file to match your device model and firmware version.
- Extract the downloaded CF Auto Root file to obtain the necessary files for flashing.
Step 2: Enable Developer Options and USB Debugging
- On your Samsung device, go to the “Settings” menu.
- Scroll down and tap on “About phone” or “About device.”
- Look for the “Build number” and tap on it seven times to enable Developer Options. You will see a message indicating that Developer Options have been enabled.
- Go back to the main “Settings” menu and tap on “Developer Options.”
- Toggle on the “USB debugging” option.
Step 3: Boot your Samsung device into Download Mode
- Power off your Samsung device.
- Press and hold the Volume Down button, the Home button (if applicable), and the Power button simultaneously.
- Release the buttons when you see a warning message on the screen.
- Press the Volume Up button to enter Download Mode.
Step 4: Flash CF Auto Root using Odin
- Connect your Samsung device to your computer using a USB cable.
- Launch Odin on your computer (ensure that you have the necessary Samsung USB drivers installed).
- In Odin, click on the AP or PDA button and select the CF Auto Root file you extracted earlier.
- Verify that the “Auto Reboot” and “F. Reset Time” options are checked in Odin.
- Double-check that only the “Auto Reboot” and “F. Reset Time” options are selected, and no other options are checked.
- Click the Start button to initiate the flashing process.
- Wait for Odin to complete the flashing process. You will see a “PASS” message in Odin once it is successful.
- Your device will automatically reboot.
After the reboot, the CF Auto Root file should have resolved the ‘DM-Verity Need to Check Verification Failed DRK’ error on your Samsung device. However, please keep in mind that rooting your device can have potential risks and may void your warranty. It’s recommended to proceed with caution and only perform these steps if you have experience with rooting and flashing custom files.
Conclusion
The ‘DM-Verity Need to Check Verification Failed DRK’ error can be a frustrating obstacle when trying to boot up your Samsung device. However, by following the methods outlined in this blog post, you can resolve this error and restore your device’s functionality. Remember to proceed with caution and backup your data before attempting any of these methods. If the issue persists, it is recommended to seek assistance from an authorized Samsung service center or a knowledgeable professional.
