1
How to Pass CTS Profile Match Failed Error Android 13
The CTS Profile Match Failed error is a common issue faced by Android users who have unlocked bootloader, rooted their devices or run a custom ROM. This error can prevent you from using certain apps that require a secure environment (Play Integrity), such as Google Pay, Samsung Pay, Banking apps, Pokemon Go and many other apps. But don’t worry, in this blog post, we will guide you step-by-step to fix it.
CTS Profile Match: Failed Error
Before we dive into the solution, it’s important to understand what the error means. CTS stands for Compatibility Test Suite, a set of tests used by Google to ensure devices and software versions are compliant with Android standards. If your device fails the CTS test, it means your device software is not recognized as genuine or secure by Google.
SafetyNet is a Google API that’s used to check whether a device has been tampered with–for instance, if it’s been rooted or if it’s running a custom ROM. Some apps, like Google Pay, won’t work on devices that don’t pass the SafetyNet check.
Also read: How to hide root from banking apps on Android
How to Pass CTS Profile Match Android 13
When your phone’s bootloader is unlocked or rooted, it triggers the cts profile match fail error and now you won’t be able to use apps that require a secure environment. Follow the instructions on how to fix the error with Magisk modules.
Prerequisites
Before we start, ensure you have the following:
- A rooted Android device (Magisk installed) or a custom ROM.
Follow the second method, if your phone is not rooted and running a custom ROM, you need to install adb and fastboot drivers.
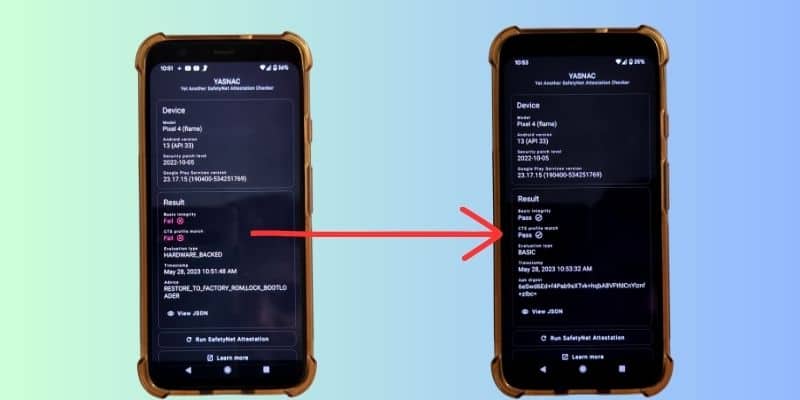
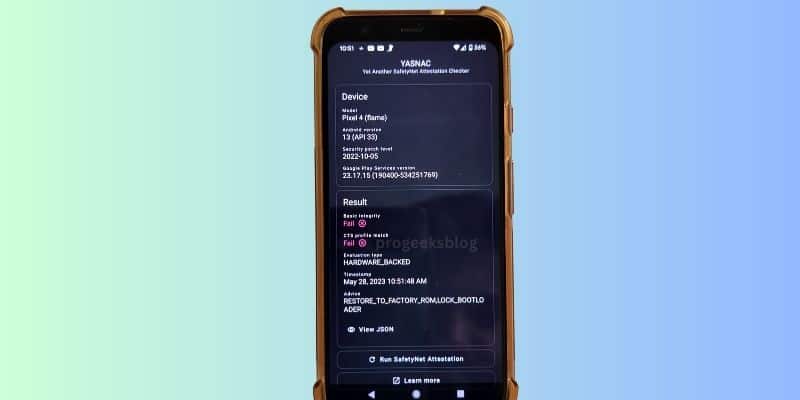
Step 1: Checking the SafetyNet Status
First, we need to confirm that the CTS profile match is indeed failing. We can do this by checking the SafetyNet status.
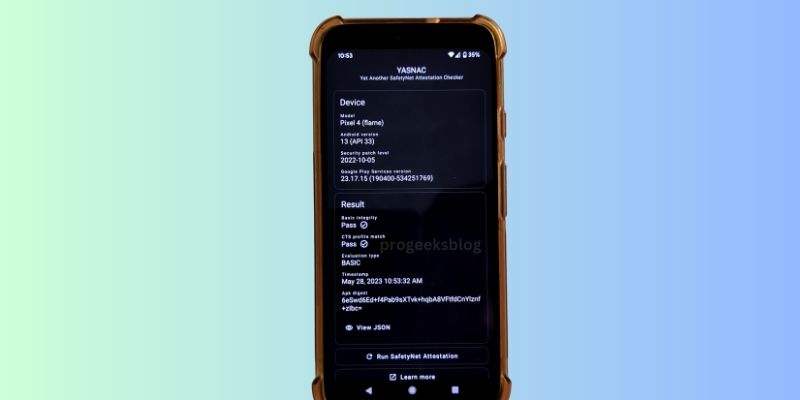
- Download and install the SafetyNet Test checker app, YASNAC, from the Google Play Store.
- Open the app and click on Run Test.
- If the CTS Profile Match shows as Failed, proceed to the next step.
Step 2: Enabling Zygisk & MagiskHide
After installing Magisk, the next step is to enable MagiskHide.
- Open the Magisk Manager app on your device.
- Go to Settings.
- Scroll down and enable MagiskHide.
- It will ask you to rename the app, I will rename it “Hideme”.
It will only pass the basic integrity test. To pass the cts profile match you’ll need to install modules in Magisk app.
Magisk Modules
The easiest way to fix is by installing Magisk modules and there are 2 popular Magisks module, SafteyNet Fix, Shamiko, and Displax Safetynet-fix (moded). You can download and install any of these 3 and it should pass the test.
Play Integrity Fix
Off all the Magisk modules, it is currently the latest supported by developers and updated version of Kdragon’s and Displax’s SafetyNet fix. I recommend you to first try this module it will pass the following checks:
- Meets_Device_Integrity
- Meets_Basic_Integrity
- Basic Integrity
- CTS profile match
The final step is to hide root from SafetyNet. If you have currently installed other modules in Magisk for the same purpose, it will auto remove it on the next reboot.
- Download PlayIntegrityFix v15.9.7
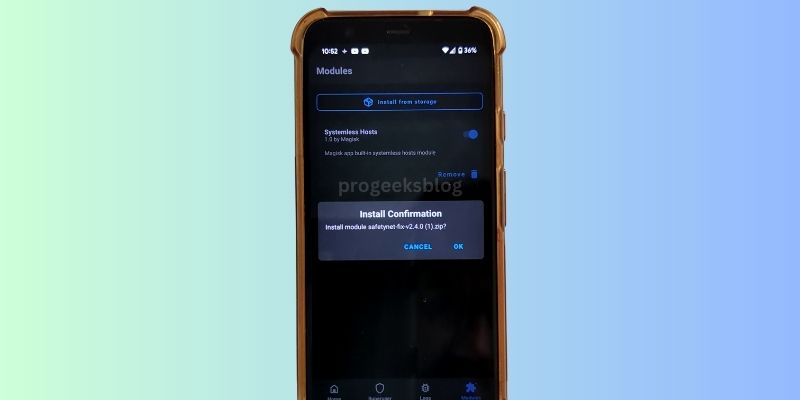
- In the Magisk Manager app, tap on the Modules section.
- Tap on “Install from Storage”.
- Select the downloaded module
- Once the module is installed, you will have to reboot your phone.
- After restarting, run YASNAC SafetyNet Attestation checker app to confirm you’ve passed basic and cts checks.
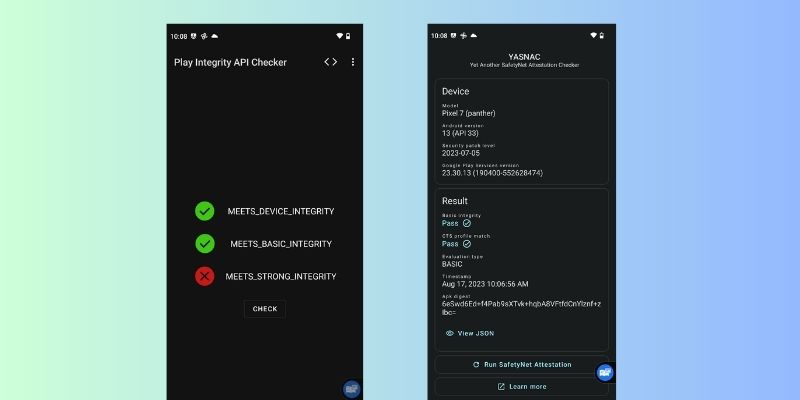
Note: Currently, there is no solution for Play Integrity Meets Strong Integrity. If I see any solution in the future, I will definitely update this guide.
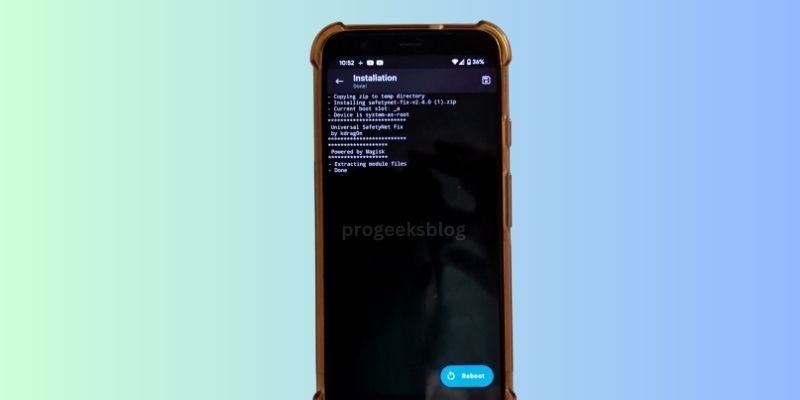
Displax Safetynet-fix v2.4.0-MOD_2.0
It is another Magisk module and a modified version of the original SafetyNetFix by Kdragon. You can download it from the download link below in official Github repo. Rest until the installation is same as before; after installing, you need to reboot your phone for changes to take effect.
Kdrag0n Universal Safetynet Fix
The kdrag0n safetynet-fix is a Magisk module that is designed to help fix the SafetyNet CTS Profile Match Failed error on Android devices. Safetynet-fix module works by making modifications to the device’s system properties to trick the SafetyNet check into thinking the device is in a compliant state, even if it’s been rooted or is running a custom ROM. This allows you to use apps that normally wouldn’t work on a non-compliant device.
It’s important to note that while this module can be very useful, it’s also a bit of a workaround, and there’s no guarantee it will continue to work in the future. Google is constantly updating SafetyNet to make it harder to bypass, so a method that works today might not work tomorrow.
As always, you should be careful when modifying your device’s system properties, as it can potentially cause issues or void your warranty. Always make sure to back up your data and understand the risks before proceeding.
The final step is to hide root from SafetyNet.
- Download safetynet-fix-v2.4.0.zip
- In the Magisk Manager app, tap on the Modules section.
- Tap on “Install from Storage”.
- Select the downloaded module, safetynet-fix-v2.4.0.zip.

- Reboot your device.
After rebooting, run the SafetyNet test again. If everything went well, the CTS Profile Match should now show as PASS.
LSPosed Shamiko
Shamiko is another alternative Magisk module you can use to fix the error.
These are the steps to download Shamiko and install it using Magisk to hide root from SafetyNet:
- Download Shamiko-v0.7.2-172-release.zip
- In the Magisk Manager app, tap on the Modules section.
- Tap on “Install from Storage”
- Select the downloaded module Shamiko-v0.7.2-172-release.zip.
- Reboot your device.
No root access? Running a custom ROM?
If your phone is not rooted and running a custom ROM or just bootloader is unlocked, you can follow the following instructions:. For this, we are going to use ih8sn to pass the CTS profile match.
Note: I have tried these methods on Android 13 and it does not work, it definitely works on Android 12 and lower.
ih8sn Guide:
- First of all, download the ih8sn from official Github repo. Make sure to download the right file for your device type. If you don’t know your device’s architecture, then find it using the command below.
- Download Platform Tools latest version.
- Unzip the file. Open the ih8sn.conf file, which is available in this directory: ih8sn-aarch64.zip\system\etc.
- Edit the file according to your device information and save the file.
- Now you can run the .\push.ps1 to push this file to your device or
- Using the Recovery method, you’ve got to boot into recovery, then Apply Update > Apply from ADB and then type the following command:
adb sideload ih8sn-<arch>.zip - Finally, reboot your device.
Adb commands to find the information of your device:
First type “adb shell” and then follow commands
| Command | Description |
|---|---|
getprop ro.product.cpu.abi |
Device Type: Displays the CPU architecture of the device (e.g., arm64-v8a, armeabi-v7a, x86, x86_64, mips). |
getprop ro.build.fingerprint |
Build_Fingerprint: Displays a string that uniquely identifies the current build, including manufacturer, model, and build ID. |
getprop ro.build.description |
Build_Description: Displays a human-readable description of the build, often containing information about the device model and Android version. |
getprop ro.build.version.security_patch |
Build Security Patch: Displays the security patch level of the Android build. |
getprop ro.build.version.release |
BUILD_VERSION_RELEASE: Displays the Android version release (e.g., 10, 11, etc.). |
getprop ro.build.version.release_or_codename |
BUILD_VERSION_RELEASE_OR_CODENAME: Displays the Android version release (e.g., 10) or codename (e.g., Q, R, etc.). |
getprop ro.product.manufacturer |
Manufacturer: Displays the manufacturer name of the device (e.g., Samsung, Google, OnePlus). |
getprop ro.product.first_api_level |
PRODUCT_FIRST_API_LEVEL: Displays the first API level supported by the device. |
getprop ro.product.name |
PRODUCT Name: Displays the product name of the device (e.g., OnePlus7Pro, Pixel 3, etc.). |
2nd Method Without Root
To use this method, make sure you’ve installed ADB and Fastboot drivers on your PC or simply download the Platform tools folder. Download links are given in the above section. It is simple code that you need to run, Make sure USB Debugging and Rooted Debugging are already enabled in Developer Options in Settings app.
Again for this method, you don’t need Root access on your Android device.
Here is the code you need to run:
adb root

adb remount

adb pull /system/build.prop .

sed -i "s/ro.secure=0/ro.secure=1/" build.prop

sed -i "s/ro.debuggable=1/ro.debuggable=0/" build.prop

adb push build.prop /system/build.prop

rm build.prop
After running above adb commands, it is recommended to reboot your phone. Also, after updating the phone, you need to repeat the same process if you want to pass SafetyNet check.
Verification
To verify you successfully fixed the cts profile match failed error, install the YASNAC – SafetyNet Checker and for Play Integrity, you can try Play Integrity API Checker from the Play Store and run it.
Fixing the CTS Profile Match failed error might seem daunting, but with the right tools and steps, it can be done quite easily. Remember, always backup your data before making any major changes to your device. Happy Android tinkering!
