How to Install TWRP Recovery Galaxy Note 8 SM-N950N
It is a step-by-step guide on how to flash TWRP recovery on Samsung Galaxy Note 8 SM-N950N using Samsung Odin flash tool. The guide is pretty simple and straight forward.
What is TWRP?
It is custom recovery for Android devices. All Android phones & tablet devices comes with stock recovery with limited options. TWRP comes with a lot of different options and features to take full backup of your ROM and restore it. You can also use it to flash custom ROMs and zip files like Magisk to root your phone. Also, when your phone IMEI status is NG and you need to repair IMEI then it is much helpful.
Requirements
Before you install TWRP on your Galaxy Note 8, there are some prerequistes you need to have to successfully install the custom recovery on your Note 8.
- Go to phone Settings > Developer options and enable USB Debugging and OEM unlock. If you don’t do this, odin will give fail error
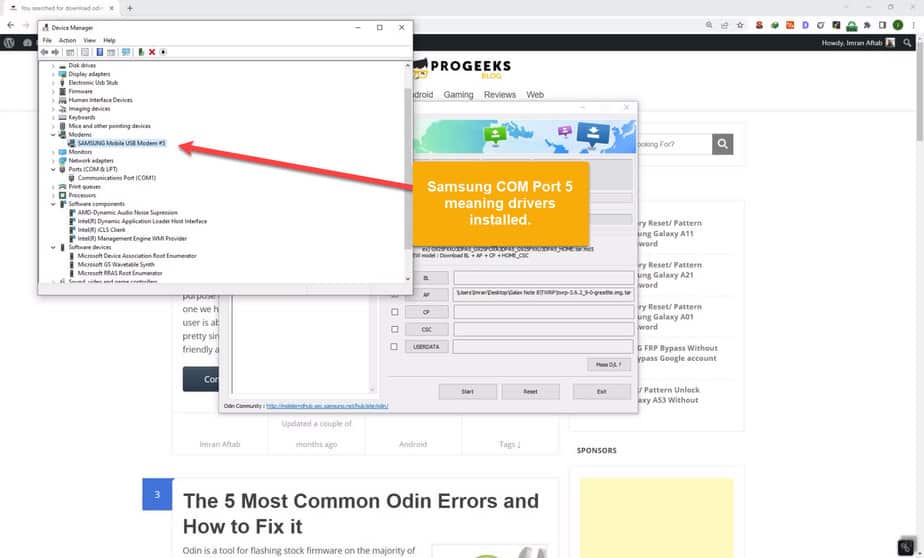
- Download and install Samsung USB drivers on your PC
- Download TWRP file for your phone model (I have given download links for all variants)
- Download Samsung Odin flash tool
- Windows PC
- USB cable to connect your phone
TWRP for Galaxy Note 8 all models
Here are the download links for TWRP from official website. Please note that Exynos and Snapdragon variants have different files.
How to identify model variant if it is Exynos or Snapdragon, is simply check your phone model number from Settings > About device and confirm it from Gsmarena under Platform and chipset information.
Also code name for Exynos is greatlte and Snapdragon variant is greatqlte. You can find it in stock recovery. Power off your phone and press and hold Volume up+Bixby+Power buttons for around 5-10 seconds and you’ll boot into stock recovery. At the top you can find this code name.
How to Install TWRP Recovery Galaxy Note 8
Here are the step-by-step instructions on how to successfully install TWRP on the Samsung Note 8.
Step 1: Run odin application as administration on your PC.
Step 2: Make sure you’ve already installed the Samsung USB drivers.
Step 3: Open Device Manager on your PC and make sure your phone is connected, odin also gives ID:COM port.
Step 4: After enabling the USB debugging and OEM unlock from Settings. Power off your phone and boot it into download mode by pression Volume down+Bixby+Power buttons simultaneously for around 5-10 seconds.
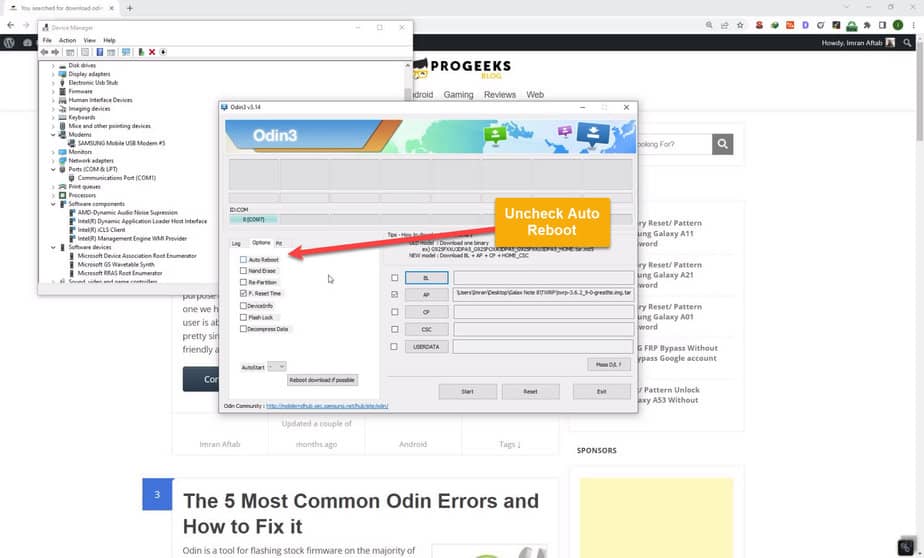
Step 5: In odin, click on options and uncheck the Auto Reboot option as shown in the screenshot below:
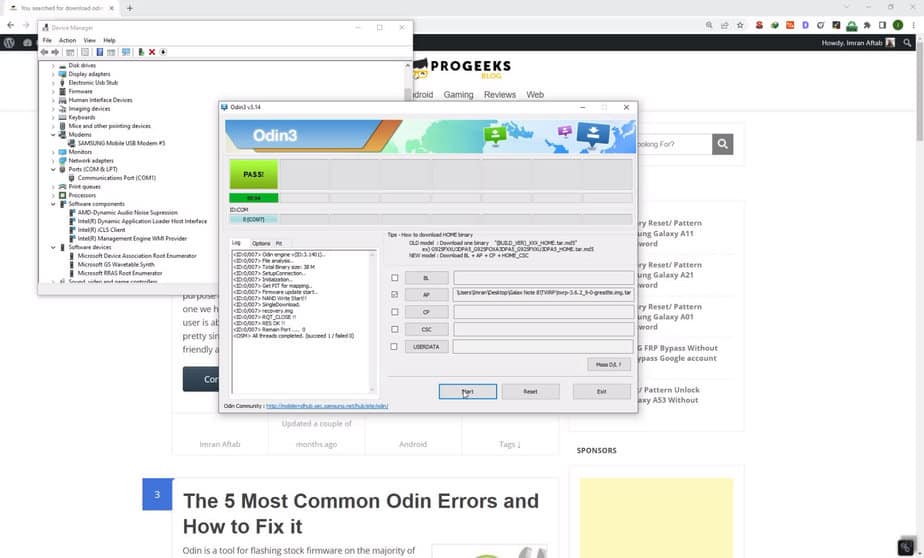
Step 6: Click on AP button in Odin and select twrp-3.6.2_9-0-greatlte.img.tar file and click on Start button to flash the recovery. It will only take a few seconds to install TWRP on your Note 8.
Step 7: It will give you a PASS! green labelled message confirming that TWRP has successfully been installed on your Note 8.
Odin Fail Error
If odin is giving you fail error, just make sure you have done the followings:
- Samsung USB drivers installed
- USB Debugging enabled
- OEM unlock enabled
If you can resolve the above, you’ll get a 100% success rate of installing TWRP on your phone.
