Step-by-Step Guide to Root Your Android Device and Install a Custom Kernel
In our previous posts, we’ve explored the Android Kernel, its significance, and how rooting and custom kernels can provide you with increased control over your device’s performance and functionality. Today, we’ll provide a step-by-step guide on how to root your Android device and install a custom kernel.
Before we proceed, it’s important to note that these processes come with some risk. Rooting your device can void its warranty, and incorrectly installing a custom kernel could potentially ‘brick’ your device, making it unusable. Therefore, it’s crucial to understand what you’re doing, follow all instructions carefully, and always back up your data before making any changes to your device.
Part 1: Unlocking the Bootloader
To root any Android device, first you need to unlock the bootloader on your device. Only a factory unlocked device owners are able to unlock the bootloader, if your device is carrier-locked you won’t be able to unlock it.
Samsung
To unlock the bootloader on a Samsung device, you typically need to follow these general steps. However, please note that the process may vary slightly depending on the specific model and software version of your Samsung device. It’s important to research and find device-specific instructions before proceeding, as unlocking the bootloader can have consequences such as voiding warranties or potentially bricking your device.
You can follow our video tutorial on how to unlock bootloader on a Samsung device and Here’s are the step-by-step instructions:
- Backup your data: Unlocking the bootloader usually involves wiping your device, so it’s crucial to create a backup of any important data you have on your Samsung device.
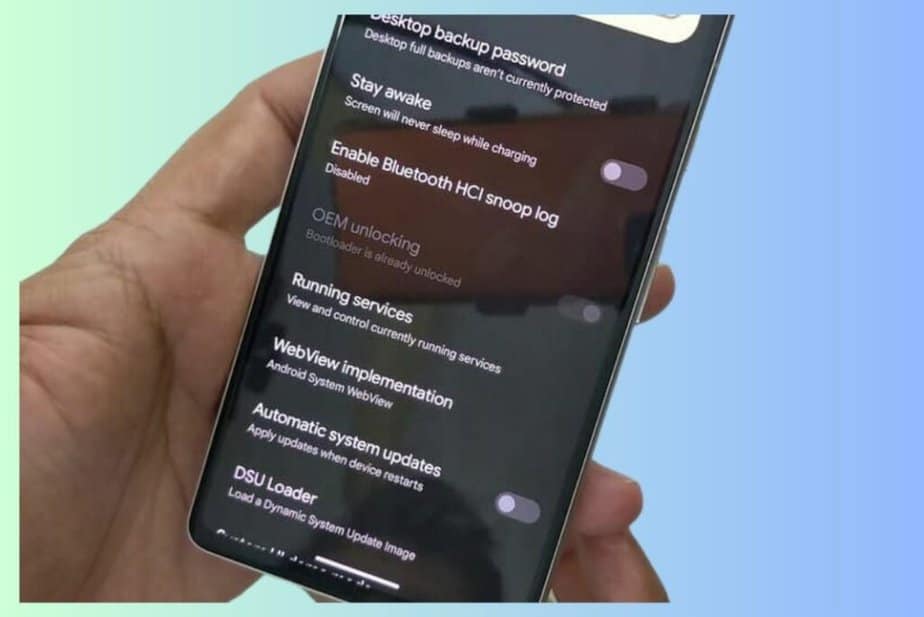
- Enable Developer Options: Go to the “Settings” menu on your Samsung device, scroll down to “About phone,” and tap on it. Find the “Build number” option and tap on it repeatedly (usually around 7 times) until you see a message indicating that Developer Options have been enabled.
- Enable OEM Unlocking: Now, go back to the main “Settings” menu and locate the “Developer Options” (which should now be visible). Open it and look for the “OEM unlocking” option. Enable it by toggling the switch to the “ON” position. You may also need to enable USB Debugging in the Developer Options.
- Obtain an Unlock Code (Optional): Some Samsung devices require an unlock code to be obtained from Samsung’s official website. Check the website for your specific device to see if you need to request an unlock code.
- Power off your device: Turn off your Samsung device completely.
- Boot into Download Mode: Press and hold the Volume Down + Volume Up and connect your phone to PC. Once you see a warning message on your device’s screen, release all the buttons. Now press the Volume up key for 3-5 seconds to enter device unlock mode.
- On the next scree, you’ll be asked confirm unlocking the bootloader. Press Volume up key to confirm. Your phone will reboot and will ask you again to press Power key to confirm. It will wipe and erase your phone and you’ll get to the setup screen.
- Verify bootloader status: After the device restarts, Connect to a WiFi network. Then go to the “Settings” menu, navigate to “About phone,” and look for “OEM unlocking”. It will say bootloader already unlocked, it means you have successfully unlocked the bootloader.
Please note that the process outlined here is a general guide, and the exact steps may differ depending on your Samsung device model and software version. It’s essential to research and find accurate instructions for your specific device to avoid any potential issues.
Google Pixel
To unlock bootloader on a Pixel device, I have already made a video tutorial as well as a step-by-step guide to unlock bootloader on any Google Pixel model.
Part 2: Rooting Your Android Device

Also read:
There are several methods to root an Android device, but we’ll use the Magisk method, which is one of the most reliable and widely used.
Step 1: Download the latest version of Magisk from the official GitHub page.
Step 2: Download your device’s boot image. This can usually be found on your device manufacturer’s website or on various Android development forums.
Step 3: Install Magisk Manager on your device. You can do this by downloading the APK from the official GitHub page and installing it like any other app.
Step 4: Open Magisk Manager and click on ‘Install.’
Step 5: Click on ‘Select and Patch a File.’ Navigate to your downloaded boot image and select it.
Step 6: Magisk Manager will now create a patched boot image. Once it’s done, transfer the patched boot image to your PC.
Step 7: Boot your device into fastboot mode. This usually involves turning off your device and then turning it back on by holding down the power button and the volume down button at the same time.
Step 8: Connect your device to your PC via USB.
Step 9: Open a command prompt on your PC and navigate to the directory where your patched boot image is located.
Step 10: Type fastboot flash boot <patched boot image file name> and hit enter.
Step 11: Once the process is complete, type fastboot reboot and hit enter.
Step 12: Install root checker app from Playstore and run it to verify root access.
![]()
Congratulations, you’ve successfully root your device!
Part 3: Installing a Custom Kernel

Step 1: Choose a custom kernel compatible with your device. You can find custom kernels on forums like XDA Developers.
Step 2: Download the custom kernel. It should be a .zip file.
Step 3: Boot your device into recovery mode. This usually involves turning off your device and then turning it back on by holding down the power button and the volume up button at the same time.
Step 4: Select ‘Install’ in your recovery’s main menu.
Step 5: Navigate to the directory where you saved your custom kernel .zip file.
Step 6: Select the .zip file and swipe to confirm the installation.
Step 7: Once the installation is complete, clear your cache and dalvik cache from the recovery menu.
Step 8: Select ‘Reboot system now.’
Congratulations, you’ve successfully installed a custom kernel!
Wrapping Up
Rooting your Android device and installing a custom kernel can open up a new world of possibilities for customizing and optimizing your device. But always remember to proceed with caution and to keep a backup of your data before making any changes. Happy tweaking!
Disclaimer: This guide is meant for educational purposes only. The author and the website are not responsible for any harm that might occur to your device as a result of following this guide. Always proceed with caution and at your own risk.
