How to Unlock Bootloader on any Google Pixel Model [Tutorial]
A step-by-step guide on how to unlock bootloader on all Google Pixel models including Google Pixel 7 Pro, Pixel 7a, Pixel 6 Pro, Pixel 6a, Pixel 5, Pixel 5a, Pixel 4 xl, Pixel 4a, Pixel 3 xl and other older models.
Unlocking the bootloader is an essential process if you want to install custom ROM, root your device, or even flash a custom recovery. It allows you to make changes to your device’s software that you couldn’t otherwise make.
Before we start, it is important to understand that unlocking the bootloader will erase all data on your device. This includes all apps, contacts, messages, photos, and files. Make sure to backup everything before proceeding with the guide.
What is Bootloader Unlock?
A Google Pixel 7 with bootloader is unlocked, warning screen.
The bootloader controls what operating system to load on your device. It is the first software that runs when you turn on your device. The bootloader is locked by default on most devices, which means that you cannot make any changes to the software without first unlocking it.
When you unlock the bootloader, you are essentially telling your device to allow modifications to the software. This allows you to install custom ROM, custom recovery (TWRP), and root your device.
Not all devices are eligible for Bootloader Unlock:
It’s important to note that not all devices can be unlocked. Some manufacturers for example Verizon don’t allow it, and some carriers may also prohibit it. Google, on the other hand, is known for allowing bootloader unlocking on their devices. However, if you have a carrier-branded device, you may need to check with your carrier first to see if they allow bootloader unlocking. A factory unlocked device can be used to unlock the bootloader.
How to Unlock Bootloader
Now that you have a basic understanding of what bootloader unlocking is, let’s get started with the step-by-step guide on how to unlock the bootloader on any Google Pixel model. The process is same for all pixel models.
Step 1: Download Google Platform Tools
The first step is to download Google Platform Tools. This is a set of tools that includes the necessary files to unlock the bootloader on your device. You can download the latest version of Google Platform Tools from here.
Step 2: Install Google USB Drivers
Next, you need to install the Google USB Drivers on your computer. This allows your computer to communicate with your device over USB. You can download the Google USB Drivers from the official website here.
Step 3: Enable Developer Options
Before we can unlock the bootloader, we need to enable Developer Options on your device. To do this, go to Settings > About Phone. Scroll down to the bottom and tap on the Build Number seven times until you see the message “You are now a developer!”

You can access developer options from Settings > System > Developer Options
Step 4: Enable OEM Unlocking
With Developer Options enabled, go back to Settings and select System > Developer Options. Scroll down and find the “OEM unlocking” option and enable it.
Step 4: Enable USB Debugging
After enabling the OEM unlocking, Scroll down in the same developer options and enable USB debugging.
Step 5: Boot your device into Fastboot Mode
Now it’s time to boot your device into Fastboot Mode. To do this, power off your device and hold down the Volume Down + Power button at the same time. Keep holding them until you see the Fastboot Mode screen.
![]()
Step 6: Connect your device to your computer
Connect your device to your computer using a USB cable.
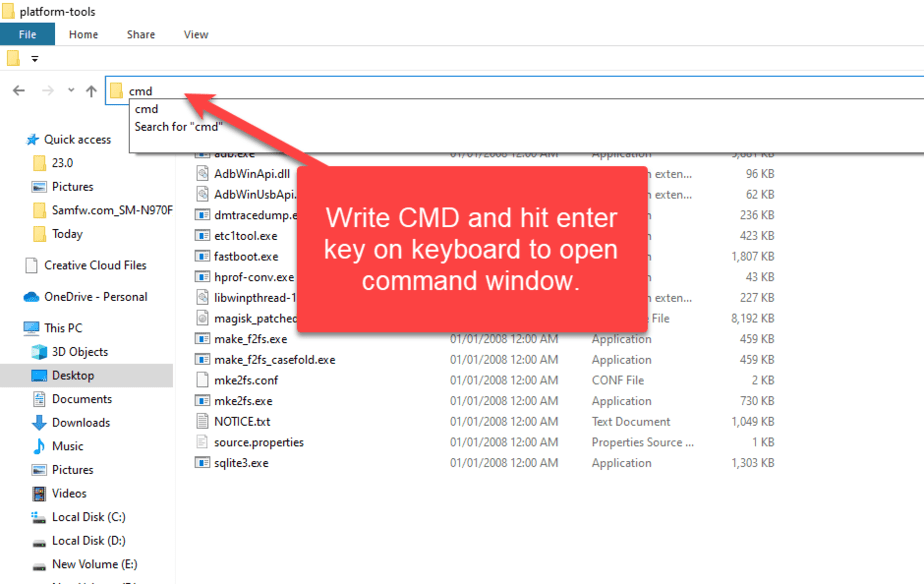
Step 8: Navigate to the Platform Tools folder
Navigate to the folder where you downloaded the Google Platform Tools in Step 1. On Windows, this will likely be in your Downloads folder. On Mac/Linux, this may be in your Home directory. Once you find the folder, open a command prompt/terminal window in that folder.
Step 9: Verify device connection
In the command prompt/terminal window, type the following command:
fastboot devices
This will verify that your device is connected properly. If you see your device listed, you’re good to go. If not, make sure that you have installed the USB drivers correctly and that your device is in Fastboot Mode.
Step 10: Unlock the bootloader
Next, we will unlock the bootloader using the following command:
fastboot flashing unlock
This will prompt a warning message on your device’s screen, warning you that unlocking the bootloader will erase all data on your device. Use the volume buttons to highlight “Yes” and press the Power button to confirm.
Step 11: Reboot your device
Once the bootloader is unlocked, you can reboot your device by typing the following command:
fastboot reboot
Your device will now boot up with an unlocked bootloader. Congratulations, you have successfully unlocked the bootloader on your Google Pixel device!
OEM Unlocking: Bootloader is already unlocked. Google Pixel 7
How to lock the Bootloader
If your phone is rooted with Magisk, then do a factory reset. Download and install the Google Platform tools, or if adb and fastboot drivers are installed system-wide, that’s fine. Follow the step-by-step instructions on how to lock the bootloader.
Conclusion
Unlocking the bootloader is an essential process if you want to customize your device’s software. It allows you to install custom firmware, custom recoveries, and even root your device. However, it’s important to remember that unlocking the bootloader will erase all data on your device. Make sure to backup everything before proceeding with the guide. Also, not all devices can be unlocked, so make sure to check with your carrier if you have a carrier-branded device.
