How to root HTC 10 and Install TWRP
HTC has finally come up with a flagship that would get them back to the competition that is mainly owned by Samsung, Google Nexus and LG. HTC 10 has everything that all 2016’s flagship must have, a 12 MP camera to take better photos, 4GB RAM for seamless multitasking with Snapdragon 820 processor and what not a powerful long lasting 3000mAh battery.
They have done a fabulous job when it comes to software, get rid of bloatwares as they are now replaced by stock Google apps to give you better experience getting closer to stock Android.
But did you know? Rooting your HTC 10 will give you freedom to make more customizations by installing mods, custom ROM, kernels and more. The tutorial will first show you how to install TWRP using the adb commands and then we will flash Chainfire Xda SuperSU to gain root access on the HTC 10. Looks simple right? Let’s move on and do it now.

Instructions:
Here are the instructions on how to install TWRP and root HTC 10 using SuperSU.
Step 1: First of, you need to unlock bootloader by going to official HTC developer site. They have made it really simple to unlock bootloader, step-by-step instructions are give on their site.
Step 2: Download TWRP recovery img file from Here.
Step 3: You also need to setup ADB and Fastboot drivers installed on your PC. Follow the tutorial to setup ADB and Fastboot on your PC within seconds.
Step 4: At this stage, I assume you’ve already setup the adb fastboot. Now rename the TWRP file you’ve downloaded earlier to “twrp.img” which makes it easier to run the command instead of having it as “twrp-3.0.2-4-pme.img“. I hope it makes sense now.
Step 5: Now if you haven’t installed the ADB drivers system-wide then you need to copy the TWRP file to adb folder should be located in the directory C:/Program Files/Minimal ADB and Fastboot or whatever method you used for installation.
Step 6: Finally it’s time to flash TWRP on HTC 10. Run the following adb command to boot into download mode:
adb reboot download
Step 7: Type another command to flash TWRP:
fastboot flash recovery twrp.img
Step 8: Congratulations! You’ve successfully install TWRP on HTC 10. To verify the installation, you need to type the below command to boot into bootloader mode and then select reboot to recovery.
fastboot reboot-bootloader
Step 9: You should now have TWRP recovery options
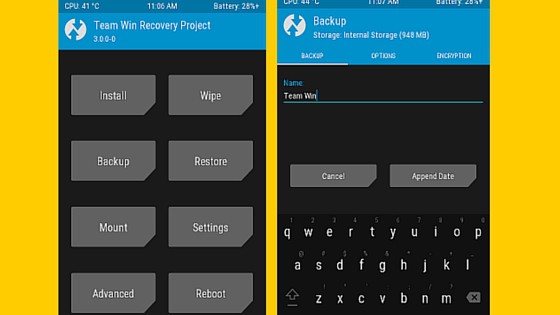
We are still not finished yet as we need to flash SuperSU using TWRP to have proper root management app that can manage and grants root permissions to apps.
Step 10: Download BETA-SuperSU-v2.74-2 so that we can flash and complete the rooting process.
Step 11: Next, tap on Advanced > ADB Sideload > Swipe to start ADB sideload and enter the following command on your PC:
adb sideload SUPERSU-FILE-PATH-HERE
SuperSU file path here means the location where the file is located.
That’s it guys! You’ve now successfully root HTC 10. You can verify the root access by installing Root Checker app from Play Store.
Did you find it helpful? Feel free to let us know in the comment section. Your feedback will help us to improve and produce high quality tutorials that are easy to read and implement for beginners.
[Via – Xda developer]
