How to Root Google Pixel 7 and 7 Pro Using PixelFlasher
Are you looking to root your Google Pixel device but aren’t sure where to start? You’ve come to the right place! In this blog post, we’ll guide you through the process of rooting your Google Pixel 7, 7 Pro, and other Pixel models using a powerful and user-friendly tool called PixelFlasher. Rooting your device allows you to unlock its full potential, enabling you to customize it to your liking and access powerful features not available to regular users.
This guide can be used to root all Pixel models including Pixel 7, Pixel 7 Pro, Pixel 6 Pro, Pixel 6, Pixel 6a, Pixel 5a, Pixel 5 5G, Pixel 4 XL, Pixel 4a 5g, Pixel 4, Pixel 3 XL, Pixel 3 and older models.
![]()
Preparation: What You’ll Need
Before we dive into the rooting process, you’ll need to download the following files:
- PixelFlasher Tool: Download the latest version from the official website.
- Factory Image: Download the latest factory image for your specific Pixel device from the Google Developers website.
- Your phone bootloader must be unlocked, follow this guide to unlock bootloader of your Pixel phone.
- Download Android Platform Tools version R34.0.4
Once you have these files downloaded and saved on your computer, you’re ready to start!
Step 1: Enable Developer Options and USB Debugging
First, you’ll need to enable Developer Options and USB Debugging on your Pixel device. To do this, follow these steps:
- Go to ‘Settings’ > ‘About phone.’
- Find ‘Build number’ and tap it 7 times to enable Developer Options.
- Go back to the main ‘Settings’ menu and tap on ‘System’ > ‘Developer options.’
- Scroll down and enable ‘USB debugging.
You can also follow this tutorial on how to enable Developer options on Android.
Step 2: Move Files to new Folder
Move all the downloaded files to a single folder. You need to unzip the Platform tools folder and rest keep the factory image file as it is.
![]()
Step 3: Run PixelFlasher.exe
Now run the PixelFlasher Tool and do the followings:
- Click on “Browse” button as shown below in the screenshot to select the unzip Android Platform tools folder.

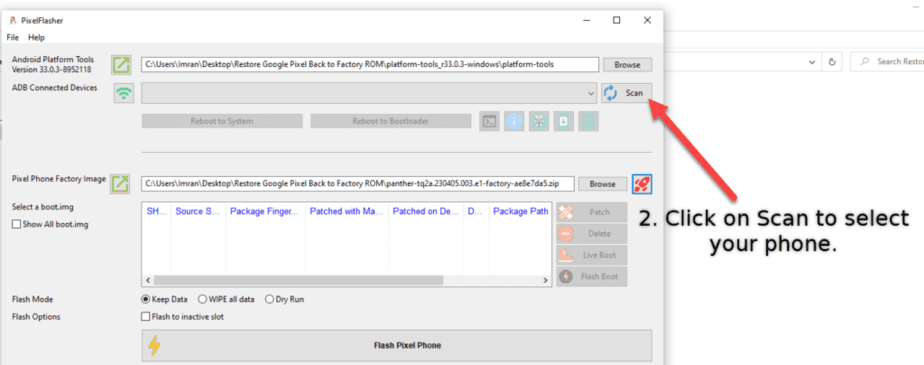
- Connect your phone to PC and click on “Scan” to select your pixel phone.

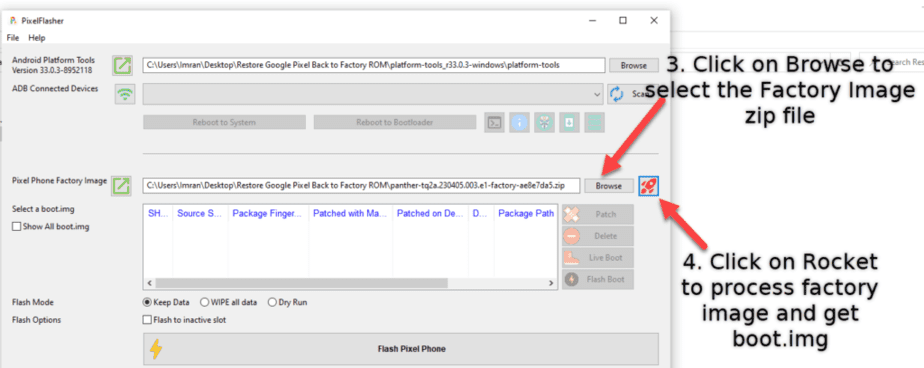
- Now click on “Browse” to select Factory Image zip file.

- Next, click on “Rocket” icon to extract and process the boot.img file from the factory image zip.
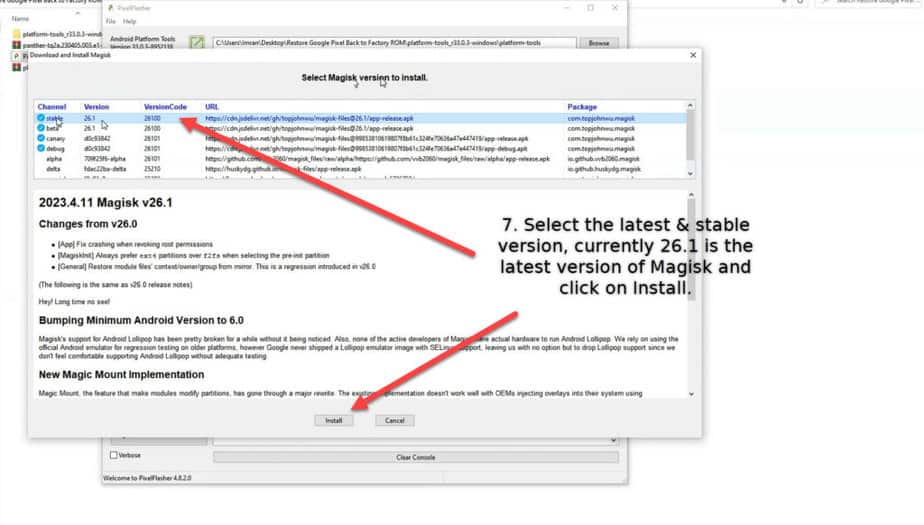
- It will take a moment to process, then select the image as shown in the screenshot and click on “Patch” button, it will give you a warning and click ok to install Magisk Manager on your phone.


- Finally, click on “Flash Boot” button and it will boot your phone to fastboot mode and within seconds it will flash the boot.img or init_boot.img file on your phone.

- That’s it, you can click on “Scan” button to reselect your device and click on Reboot to System. You can also manually reboot your phone.
- After reboot, open Magisk Manager app, it will ask you to reboot your phone to complete the installation.
- Finally, install the root check from Play Store and run to verify root access.
Congratulations! Your Google Pixel device is now successfully rooted. You can also install a Custom ROM, if you would like, here’s StagOS ROM for Pixel 7 and 7 Pro.
Conclusion
Rooting your Google Pixel device using the PixelFlasher tool is a simple and straightforward process that allows you to unlock your device’s full potential. With root access, you can customize your phone by installing custom ROM, kernels, recovery, modify system files, get rid of system apps that were previously not possible. We hope this guide has been helpful in guiding you through the rooting process. If you have any questions or need further assistance, feel free to leave a comment below. Happy rooting!
