1
How to Flash a Factory Image on Google Pixel: A Step-by-Step Guide
Restore your Google Pixel device to its original factory settings or update the firmware with this comprehensive guide.
Flashing a factory image on a Google Pixel involves several steps. This process is helpful if you want to restore your device to its original factory settings or if you want to update the firmware. Follow the instructions below to flash the factory image on your Google Pixel device, including the latest Pixel 7 Pro, Pixel 7, Pixel 6a, Pixel 6, 6 Pro, Pixel 5a, Pixel 5, Pixel 4a 5G, Pixel 4 XL, Pixel 4, Pixel 3 XL, Pixel 3, and older models.
Install /Flash Factory Image using Android Flash Tool
![]()
Flashing a factory image on a Google Pixel can be useful if you want to restore your device to its original state or if you want to update to the latest version of Android. Here are the steps to follow:
Warning: Flashing a factory image will erase all your data, including photos, apps, and other personal information. Be sure to back up your data before proceeding. Also, make sure your device is charged to at least 50% of its battery level.
Step 1: Download Necessary Tools and Files
- Download the latest factory image for your Google Pixel from the official Google Developers website.
- Download the Android SDK Platform-Tools package for your operating system.
- Download Pixel USB drivers.
- You also need to unlock the bootloader, here is the step-by-step guide to unlocking bootloader.
- Extract the Platform-Tools package to a folder on your computer. This folder will contain the necessary ADB and Fastboot tools.
- Extract the factory image you downloaded in step 1 to a folder on your computer.
![]()
Step 2: Enable USB Debugging
- On your Pixel phone, go to “Settings” > “About phone.”
- Tap on “Build number” seven times to enable “Developer options.”
- Go back to the main “Settings” menu and tap on “System” > “Advanced” > “Developer options.”
- Toggle the switch to the right to enable “USB debugging.”
![]()
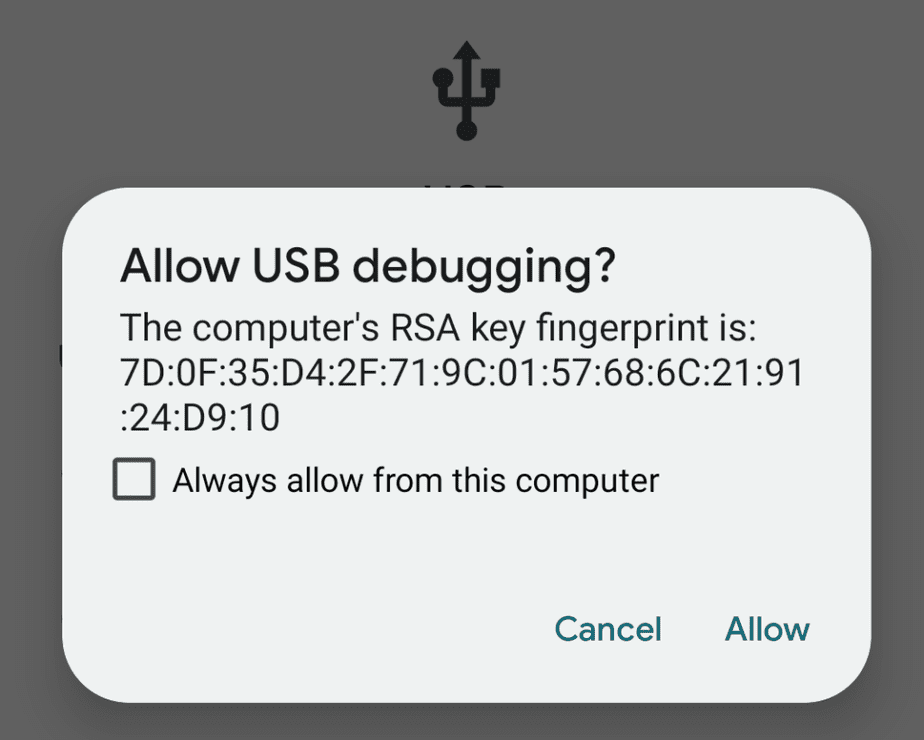
Step 3: Connect Your Google Pixel to Your Computer
- Connect your Google Pixel to your computer using a USB cable.
- A prompt will appear on your phone to allow USB debugging. Tap “Allow.”
Step 4: Boot into Fastboot Mode
![]()
- Open a command prompt or terminal window on your computer.
- Navigate to the folder where you extracted the Platform-Tools package.
- Type “adb devices” and press Enter. You should see your device listed.
- Type “adb reboot bootloader” and press Enter. Your device will now boot into Fastboot mode. Alternatively, you can also power off your phone, then hold the volume down + power keys together and your phone will boot into fastboot.
- Finally type “fastboot devices“and press Enter. This will confirm if PC has recognized your device in fastboot mode or not.
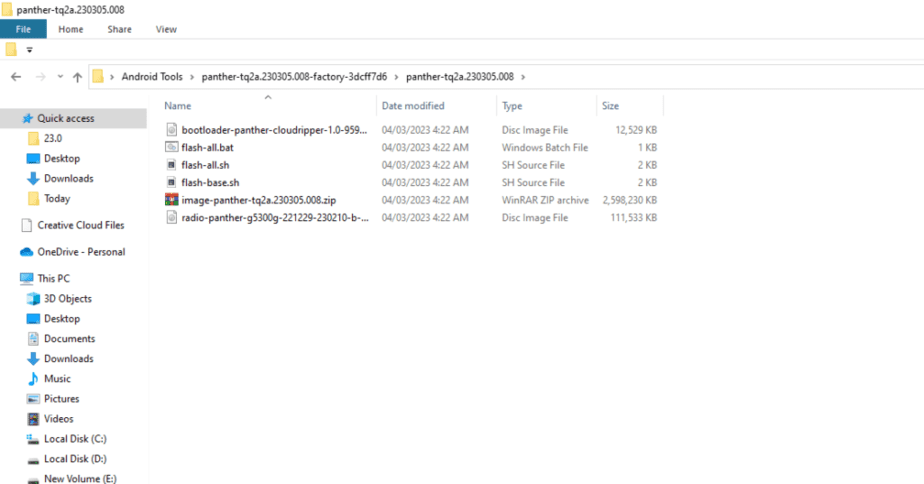
Step 5: Flash the Factory Image
- Navigate to the folder where you extracted the factory image on your computer.
- Locate the “flash-all” script (flash-all.bat for Windows or flash-all.sh for Mac/Linux) and double-click it to execute the script.
- The script will start flashing the factory image on your Google Pixel device. Do not disconnect your device or close the command prompt/terminal window during this process.
- Once the process is complete, your device will automatically reboot.
Your phone should now be running the factory image. Go through the setup process, and you’re all set.
Install / Flash Stock ROM using Android Flash Tool
You can also use the online Android flash tool to flash the latest factory image on your Pixel device, which is one of the easiest method for beginners. You just have to follow the on-screen instructions to download and flash the firmware.
Here is the video tutorial on how to use it:
Conclusion
In conclusion, flashing the factory image on your Google Pixel phone can be a useful tool for fixing software issues or unlocking your device’s full potential. Whether you own a Pixel 7, 7 Pro, Pixel 6, Pixel 6a, Pixel 5, or an older model, the steps involved in flashing the factory image are similar. It’s important to make sure you have the correct firmware version and follow the instructions carefully to avoid damaging your phone. With a little patience and attention to detail, you can successfully flash the factory image on your Google Pixel phone and enjoy a smoother and more stable user experience.
Related Guides for Google Pixel:
- How to root Google Pixel 7 / Pixel 7 Pro
- How to Factory Reset Google Pixel 7 / 7 Pro (Hard Reset)
- How to Unlock Bootloader on any Google Pixel Model [Tutorial]
- How to Lock the Bootloader on a Google Pixel Phone: Step-by-Step Guide
Frequently Asked Questions
Q1: Will flashing a factory image erase my data on my Pixel device?
Yes, flashing a factory image will erase all data on your Pixel device, including apps, photos, and personal information.
Q2: Is unlocking the bootloader necessary for flashing a factory image?
Yes, unlocking the bootloader is necessary to flash a factory image on a Pixel device.
Q3: How can I backup my data before flashing a factory image?
You can backup your data using built-in Google One (Not free), Photos and videos can be backup using the Google Photos app, third-party apps, or by manually copying files to a computer or external storage device.
Q4: Can I flash a factory image without using a computer?
No, flashing a factory image on a Pixel device typically requires a computer with ADB and Fastboot tools.
Q5: Will flashing a factory image void my Pixel device’s warranty?
No, it will not void your device warranty.
Q6: How can I relock the bootloader after flashing a factory image?
To relock the bootloader, boot your device back into Fastboot mode and run the “fastboot flashing lock” command.
Q7: What are the risks associated with flashing a factory image on my Pixel device?
Risks include data loss, and possible device malfunction if the process is not performed correctly.
Q8: Can I flash a factory image from a different device model or Android version?
No, only flash factory images specific to your device model and Android version.
Q9: What should I do if my Pixel device gets stuck in a boot loop after flashing a factory image?
Reflash the factory image or try a different version to resolve the boot loop issue.
Q10: How can I troubleshoot issues that arise during the factory image flashing process?
Check USB connections, driver installation, and follow each step carefully to troubleshoot issues.
