How to Update a Google Pixel Phone
Keeping your Google Pixel phone up to date with the latest software updates is crucial for optimal performance, enhanced security, and access to new features. This guide will provide step-by-step instructions on how to update your Google Pixel phone using automatic updates from Settings and manually updating using the Pixel Flasher tool to ensure you’re always running the latest version of Android.
This Android update guide is applicable for Google Pixel models, including Pixel 7a, Pixel 7 Pro, Pixel 7, Pixel 6 Pro, Pixel 6, Pixel 6a, Pixel 5a, Pixel 5, Pixel 4 XL, Pixel 4a 5g, Pixel 4, Pixel 3 XL, Pixel 3, and older models.
System Update from Settings
The first method is to try checking for updates from phone settings, and if system updates are available for your device, you’ll get a notification to download and install the security update. However, there are instances where updates are officially released for a particular device, but you won’t be able to install them, and the only way left is to manually install the update on your Pixel device.
Fortunately, I have shared both methods, so choose whatever is easy and convenient for you.
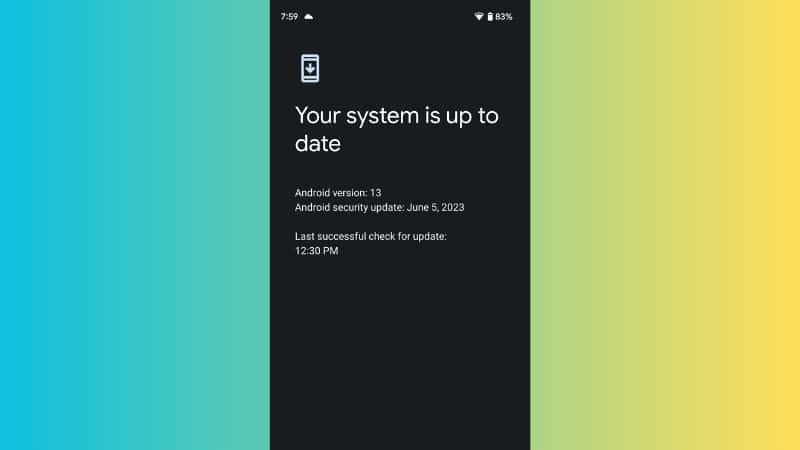
Step 1: Check for updates
- Unlock your Google Pixel phone and go to the home screen.
- Swipe down from the top of the screen to access the notification panel.
- Tap on the gear-shaped “Settings” icon to open the Settings menu.
- Scroll down and tap on the “System” option.
- Tap on “System Update” to check for available updates.
Also read: How to root Google Pixel 7 using PixelFlasher
Step 2: Downloading and Installing Updates
- If an update is available, tap “Download and Install” to begin the update process.
- Wait for the download to complete. This may take some time, depending on the size of the update and your internet connection speed.
- Once the download is finished, you will be prompted to install the update. Tap on “Install” to proceed.
- Your phone will now restart to install the update. It may take a few minutes for the installation process to complete.
- After the installation is finished, your phone will automatically restart with the updated software.
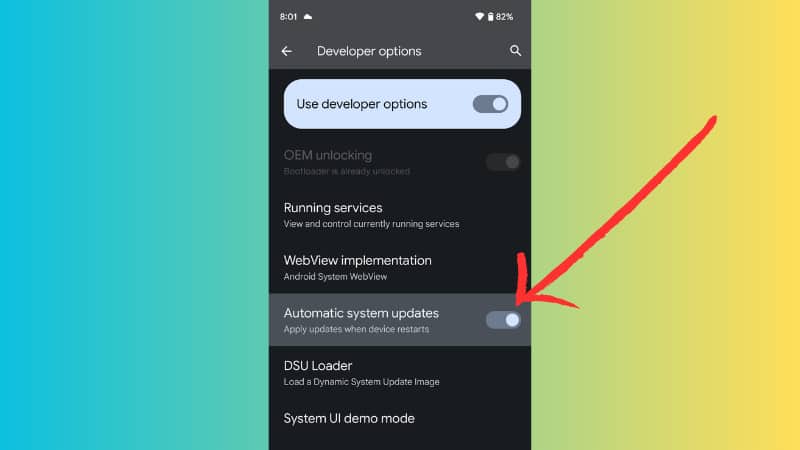
Step 3: Setup Automatic Updates
- To enable automatic updates, go back to the “System” menu in Settings.
- Tap on “Developer Options“.
- Toggle on the “Automatic system updates” option.

- With this setting enabled, your Google Pixel phone will download and install updates in the background when connected to Wi-Fi.
Also read: How to Hard Reset / Factory Reset Google Pixel 7a
Manually Install Android Update using Pixel Flasher
If for som reasons like Google Pixel 7, you’re not getting the Android update from System updates then follow the following steps to manully flash the firmware or factory image using the PixelFlasher tool.
Downloads:
To manually install Android updates on your Pixel device, first you need to download the following files and install them on your PC:
- Download the latest factory image for your Google Pixel from the official Google Developers website.
- Download Platform-Tools R33.0.3 package for your operating system.
- Download PixelFlasher.
- Download and install Google USB drivers on your PC.
- You also need to unlock the bootloader, here is the step-by-step guide to unlocking bootloader.
Step 1: Enable Developer Options and USB Debugging
First, you’ll need to enable Developer Options and USB Debugging on your Pixel device. To do this, follow these steps:
- Go to ‘Settings‘ > ‘About phone.’
- Find ‘Build number‘ and tap it 7 times to enable Developer Options.
- Go back to the main ‘Settings’ menu and tap on ‘System‘ > ‘Developer options.’
- Scroll down and enable ‘USB debugging‘.
You can also follow this tutorial on how to enable Developer options on Android.
Step 2: Move Files to new Folder
Move all the downloaded files to a single folder. You need to unzip the Platform tools folder and rest keep the factory image file as it is.
![]()
Also read: Step-by-Step Guide: How to root Pixel 7a with Magisk
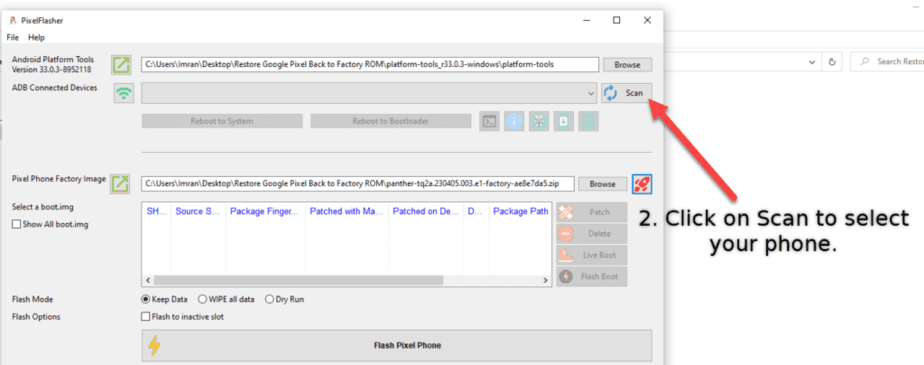
Step 3: Run PixelFlasher.exe
Now run the PixelFlasher Tool and do the followings steps to successfully install the new Android update.
- Click on “Browse” button as shown below in the screenshot to select the unzip Android Platform tools folder.

- Connect your phone to PC and click on “Scan” to select your pixel phone.

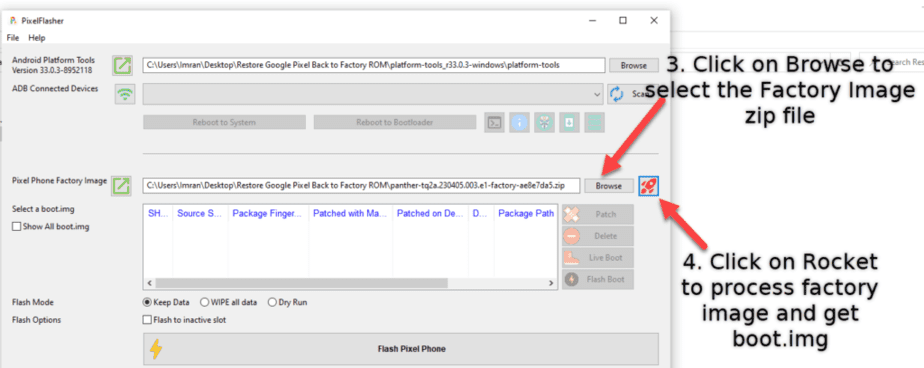
- Now click on “Browse” to select Factory Image zip file.

- Next, click on “Rocket” icon to extract and process the firmware file.
- It will take a moment to process, once done, now you need to select the Flash mode, Keep Data, WIPE all data, Dry Run (for testing). If you want to keep that then select Keep data option and click on Flash Pixel phone.
- The update process will take 5-6 minutes depending on your PC. During the update process, it will automatically boot your phone into Fastboot mode and your device will reboot multiple times during the update.
Troubleshooting
- If you encounter any issues during the update process, ensure that your phone has sufficient battery charge or connect it to a power source.
- Make sure your phone is connected to a stable Wi-Fi network to prevent interruptions during the download and installation.
- If you’re experiencing persistent update problems, try restarting your phone and repeating the update process.
- In case the update process fails repeatedly, visit the official Google Pixel support website or contact customer support for assistance.
Conclusion
Regularly updating your Google Pixel phone is essential for optimal performance, security, and access to new features. By following this step-by-step guide, you can easily check for updates, download and install them, and even set up automatic updates. Enjoy the benefits of an up-to-date device and stay on top of the latest Android software.
